
게으른개발너D
[JS] Momentum App 5 - Weather 본문
Geolocation
이제 내 Momentum App에 현재 날씨를 추가해주고싶다.
날씨를 추가하기 위해선 현재 사용자의 위치 정보가 필요하다.
그건 navigator.geolocation로 알 수 있다.
navigator.geolocation.getCurrentPosition(함수1, 함수2);getCurrentPosition function을 호출하면 되는데,
첫번째 파라미터엔 함수 호출이 성공했을 때, 두번째 파람엔 함수 호출에 실패했을 때
보여줄 이벤트를 집어넣으면 된다.
function onGeoSuccess(position) {
    console.log(position);
}

function onGeoError() {
    alert("Can't find you. No weather for you.");
}

navigator.geolocation.getCurrentPosition(onGeoSuccess, onGeoError);
호출에 성공했을 때 현재 위치 정보를 console에 찍히게 했다.
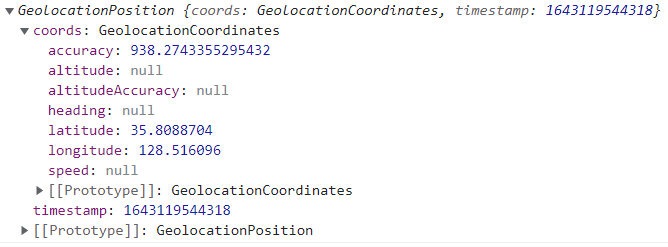
다음과 같은 결과가 나온다.
coords를 열어보면 위도와 경도까지 알 수 있다.
function onGeoSuccess(position) {
    const lat = position.coords.latitude;
    const lon = position.coords.longitude;
    console.log("You live in", lat, lon);
}

function onGeoError() {
    alert("Can't find you. No weather for you.");
}

navigator.geolocation.getCurrentPosition(onGeoSuccess, onGeoError);
!!!
꼴랑 몇줄의 코드로 사용자의 위치를 알 수 있다ㅎㅎㅎ
위도와 경도 정보를 이용해서 날씨를 가져와보자
이건 날씨 API를 이용하면 된다.
Weather API
1. weather API
날씨 API는 아래 사이트에서 이용할 수 있다.
https://openweathermap.org/api
Weather API - OpenWeatherMap
Please, sign up to use our fast and easy-to-work weather APIs. As a start to use OpenWeather products, we recommend our One Call API 3.0. For more functionality, please consider our products, which are included in professional collections.
openweathermap.org
API를 사용하기 위해선 먼저 가입을 해야한다.
살펴보면 생각보다 엄청 많고 다양한 API들을 만나볼 수 있다.
우리는 위치에 대한 현재 날씨 정보를 얻기위해 Current Weather Data를 사용할 거다

API doc을 클릭하고 조금 내려보면 API를 call할 수 있는 주소를 제공해 준다
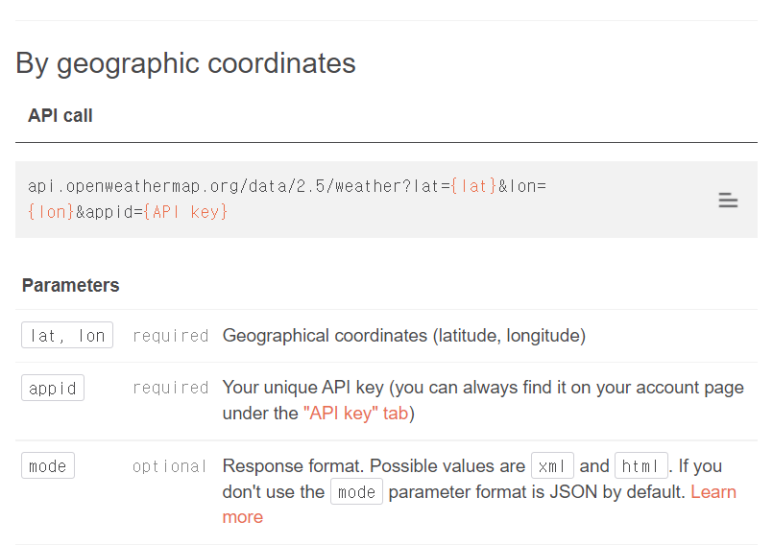
api.openweathermap.org/data/2.5/weather?lat={lat}&lon={lon}&appid={API key}
{lat} 자리에 아까 찾아냈던 위도정보를,
{lon} 자리에 경도정보를 넣는다.
{API key} 자리엔 가입하고 얻은 나의 key를 넣는다
페이지 오른쪽 위, 별명에 마우스를 올려서 My API keys에 들어가면

나의 Key 번호를 볼 수 있다.

이 API call 주소가 제대로 작동하는지 확인해 보자
api.openweathermap.org/data/2.5/weather?lat=35.8088704&lon=128.516096&appid={API key}
const API_KEY = "23DG4DGD82HH50370HH20SDSS2";

function onGeoSuccess(position) {
    const lat = position.coords.latitude;
    const lon = position.coords.longitude;
    const url = `https://api.openweathermap.org/data/2.5/weather?lat=${lat}&lon=${lon}&appid=${API_KEY}`;
    console.log(url);
}
참고로 위에 적은 API_KEY는 임시로 아무렇게나 적은 문자이다.
위 코드를 실행하면

콘솔에 위와 같이 주소가 나오고 주소를 클릭하면

이렇게 날씨 정보가 나온다.
우리 동네 이름까지 나온다 소름이다..
2. fetch
이제 이 url을 우리가 직접 부르지 말고 JavaScript가 부르게 하자
이때 등장하는 것이 fetch이다.
function onGeoSuccess(position) {
    const lat = position.coords.latitude;
    const lon = position.coords.longitude;
    const url = `https://api.openweathermap.org/data/2.5/weather?lat=${lat}&lon=${lon}&appid=${API_KEY}`;
    fetch(url);
}
페이지에서 위치 정보를 허용하면 개발자도구의 Network에 이렇게 나타난다.

조금 느리지만 Javascript가 url을 호출했다.
클릭해서 preview를 살펴보면 아까 봤던 내용들이 나온다.

날씨, 온도 정보 등등을 가져오는걸 확인할 수 있다.
3. Parameter 적용
온도가 278.97인걸 보면 절대온도(K)로 나오는 거 같은데 이걸 섭씨온도로 변경해 보자.
아까 API 사이트에서 call 주소 아래에 있는 Parameters를 살펴보자.
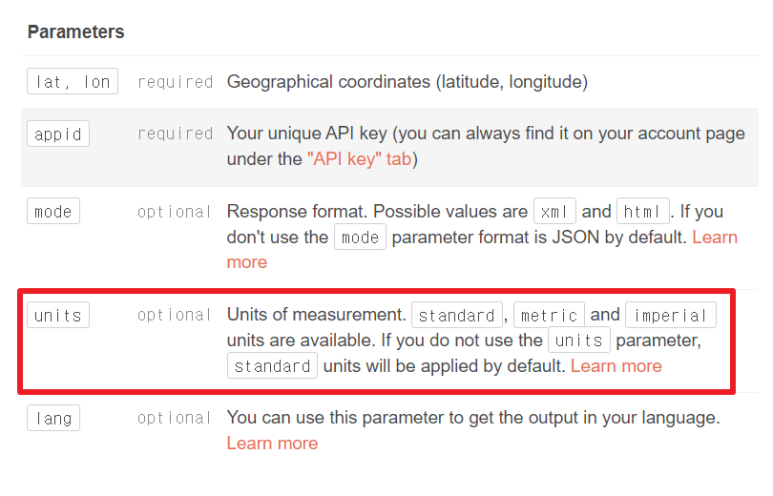
여기 단위를 바꿀 수 있는 parameter가 있다.
우리나라는 미터 단위를 이용하니깐 units를 metric으로 지정해준다.
url 마지막에 &units=metric를 추가하여 다음과 같이 작성한다.
https://api.openweathermap.org/data/2.5/weather?lat=${lat}&lon=${lon}&appid=${API_KEY}&units=metric온도를 보면 다음과 같이 나온다

섭씨 3.86도로 변경되었다.
4. JSON
이제 이 정보들을 화면에 표시하자.
화면에 표시하려면 이 정보들 몇개를 변수에 담아서 뿌려줘야하는데
정보들은 JSON형태이기 때문에 JSON으로 읽어줘야한다.
다음과 같이 작성하자
fetch(url).then((response) => response.json())url을 호출한다.
then, 부른 정보를 response에 담아 JSON으로 정보를 읽었다.
fetch(url).then((response) => response.json()).then((data) => {

});then, JSON으로 읽은 정보를 data에 담았다.
data로 날씨 관련 정보를 구현하면 된다.
나는 날씨와 온도를 화면에 보여주고 싶다.
먼저 날씨를 화면에 표시해 보자.
url로 불러온 정보를 다시 보면 날씨부분은 이렇게 되어있다.

대괄호가 있는 걸 보면 weather은 배열이며, 배열 0번째의 main에 날씨 정보가 있다.
날씨는 다음과 같이 불러오면 된다.
data.weather[0].main;다음 온도를 표시해 보자

중괄호가 있는 걸 보면 object형으로 되어있다.
온도는 다음과 같이 불러오면 된다.
data.main.temp;화면에 표시하기 위해 다음과 같이 작성했다.
function onGeoSuccess(position) {
    const lat = position.coords.latitude;
    const lon = position.coords.longitude;
    const url = `https://api.openweathermap.org/data/2.5/weather?lat=${lat}&lon=${lon}&appid=${API_KEY}&units=metric`;
    fetch(url).then((response) => response.json()).then((data) => {
        const weather = document.querySelector("#weather span:first-child");
        const degree = document.querySelector("#weather span:last-child");
        weather.innerText = data.weather[0].main;
        degree.innerText = data.main.temp;
    });
}
화면엔 이렇게 표시된다.

weather.js
const API_KEY = "23DG4DGD82HH50370HH20SDSS2";

/**
 * 현재 위치 정보 제공에 동의시
 * 날씨와 온도 정보 제공
 * @param {*} position
 */
function onGeoSuccess(position) {
    const lat = position.coords.latitude;
    const lon = position.coords.longitude;
    const url = `https://api.openweathermap.org/data/2.5/weather?lat=${lat}&lon=${lon}&appid=${API_KEY}&units=metric`;
    fetch(url).then((response) => response.json()).then((data) => {
        const weather = document.querySelector("#weather span:first-child");
        const degree = document.querySelector("#weather span:last-child");
        weather.innerText = data.weather[0].main;
        degree.innerText = data.main.temp;
    });
}

/**
 * 현재 위치 정보 제공 실패시
 */
function onGeoError() {
    alert("Can't find you. No weather for you.");
}

navigator.geolocation.getCurrentPosition(onGeoSuccess, onGeoError);'프로젝트 > Side Project' 카테고리의 다른 글
| [JS] Paint App 1 - style (0) | 2023.02.14 |
|---|---|
| [JS] Momentum App 6 - Style (0) | 2023.02.13 |
| [JS] Momentum App 4 - To Do (0) | 2023.02.13 |
| [JS] Momentum App 3 - Quotes and Background (0) | 2023.02.13 |
| [JS] Momentum App 2 - Clock (0) | 2023.02.12 |


